Are you encountering NVIDIA control panel display settings missing? Missing the display settings on Nvidia control panel takes away the ability to adjust crucial display settings such as resolution, refresh rate, and color calibration. This is a frustrating issue to deal with.
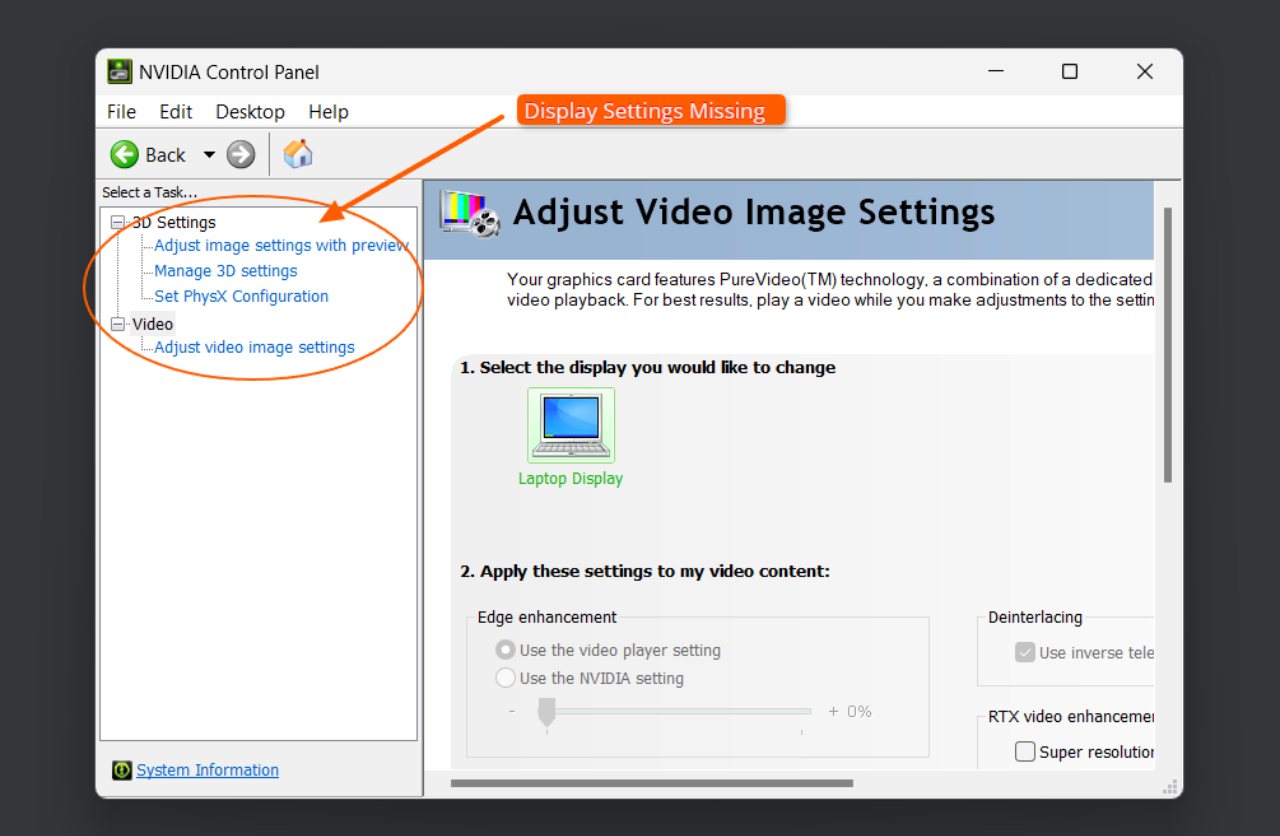
Display settings can disappear from the NVIDIA control panel due to incorrect display output configuration, outdated or incompatible Nvidia drivers, Nvidia service malfunction, corrupted Nvidia control panel, and missing registry subkeys and values.
In this post, we will talk about the reasons for missing display settings in Nvidia control panel and what are the workarounds for this.
Reasons: Missing Display Settings On NVIDIA Control Panel
#1. PC systems often incorporate two primary display options: integrated graphics and NVIDIA graphics. When the integrated graphics chip serves as the primary display controller for your monitor or laptop’s internal screen, the Nvidia control panel won’t display the corresponding settings.
- This is because the integrated graphics chip is directly connected to the display output, bypassing the NVIDIA graphics card.
- Due to the physical connection of the display output to the integrated GPU, the NVIDIA GPU is compelled to route its rendered data through the integrated GPU. This means that the NVIDIA chip handles the processing of game or application graphics, but the final output is passed to the integrated GPU for actual display.
- You can still get the Display Settings in your Nvidia Control Panel by connecting an external monitor and configuring the output to that external monitor, enabling discrete GPU at BIOS, or using a MUX switch.
#2. Updating your Nvidia driver can sometimes lead to the disappearance of Display Settings from the Nvidia Control Panel. This is common in laptops, where the default driver typically grants access to the display settings. Several users have reported encountering this issue after updating their Nvidia drivers. In such cases, performing a driver rollback often resolves the problem.
#3. Some NVIDIA services such as the “NVIDIA Display Container LS” and “NVIDIA LocalSystem Container” need to be running in order for the display settings to be available.
#4. An incompatible graphics card driver can be one of the common causes of missing display settings. Updating to the latest graphics driver also fixes corrupted NVIDIA Control Panel files just in case.
Fixes: NVIDIA Control Panel Display Settings Missing
1. Update BIOS to use discrete GPU
If you are a laptop user check if your laptop has a MUX switch. Not all notebooks provide a MUX switch, but if your model has this feature, you can enable it via the BIOS/CMOS setup interface.
Sometimes, you might need to update your BIOS version to unlock this video card switching. I tried this on my Acer Nitro AN517-55 and got the latest BIOS from here.
After updating the BIOS, you would want to access the BIOS (follow your notebook’s BIOS access keys) to switch from Optimus to Discrete GPU.
Typically you will find this setting on the Advanced tab > Look for an option related to Display mode > If there’s one then switch it from Optimus to Discrete GPU only. Certain PCs feature MSHybrid, activating the dGPU as needed while primarily utilizing the power-saving iGPU.
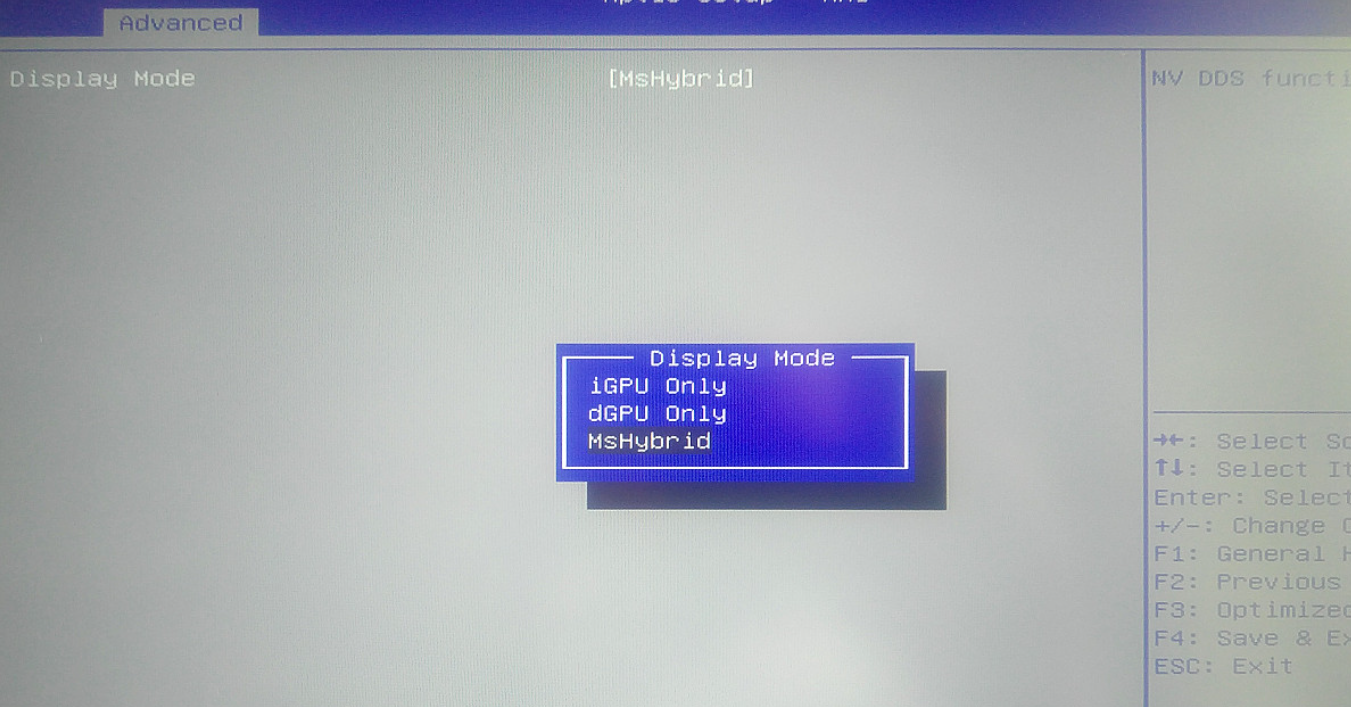
Once you save and exit BIOS, you should get the display settings back on your Nvidia control panel. Switching to dGPU from iGPU also improves performance as there’s no output image passed through the iGPU.
In some PCs, you will be able to configure the MUX switch via in-house control apps such as Nitrosense (ACER) or Armory Crate on ASUS ROGs for example.
You might be interested in | How to Fix: Geforce Experience FPS Counter Not Showing
2. Connect an external monitor
When your primary monitor is connected to the integrated graphics card, missing display settings in Nvidia control panel is inevitable. This is because the integrated GPU is responsible for rendering the display on the primary monitor, and the Nvidia graphics card is only used for rendering displays that are connected to it.
However, as soon as you connect an external monitor to the Nvidia graphics card, the Nvidia control panel will detect the new monitor and display the settings for it. This is because the Nvidia graphics card is now responsible for rendering the display on the external monitor.
Here’s what you need to do:
- Link your PC to an external monitor using either HDMI or DisplayPort.
- Open Windows settings, then select “Display” settings.
- Ideally, the display should duplicate, but you have to choose “extend these displays.”
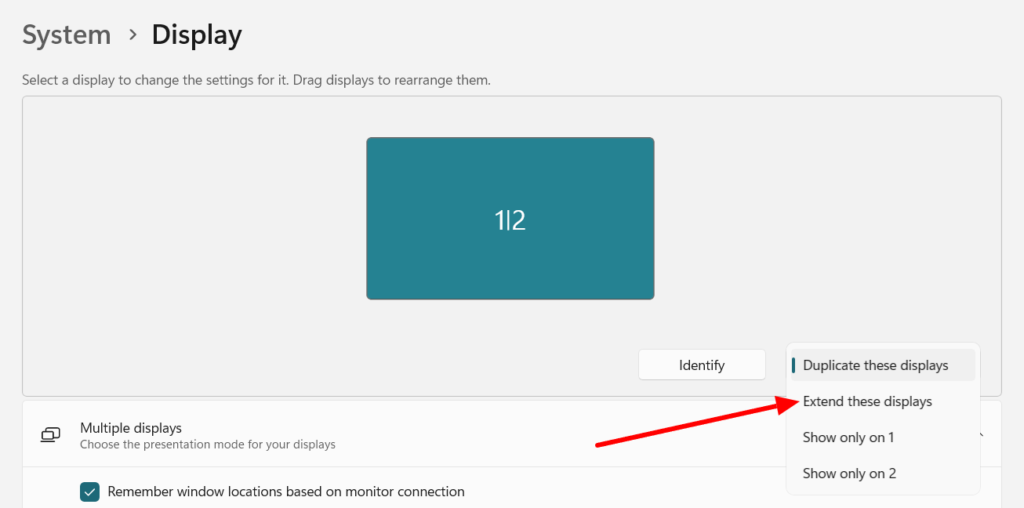
- A message will pop up asking if you want to save the settings. Click on “Keep settings” to save.
- Afterward, scroll down until you find the related settings within the display section.
- Then you will need to select “Advanced Display” and choose the external display from the dropdown menu.
- Once you select the external display, the display information tab should appear, showing a hint that it’s connected to the Nvidia GPU.
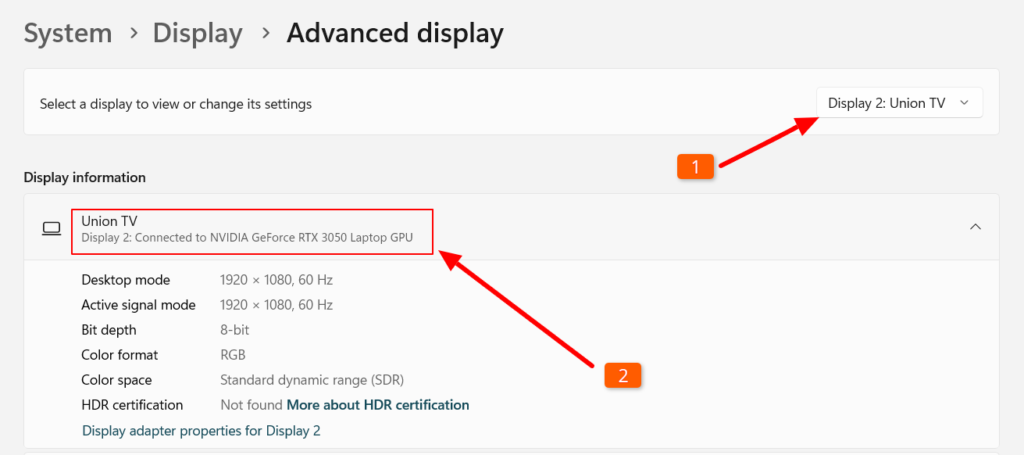
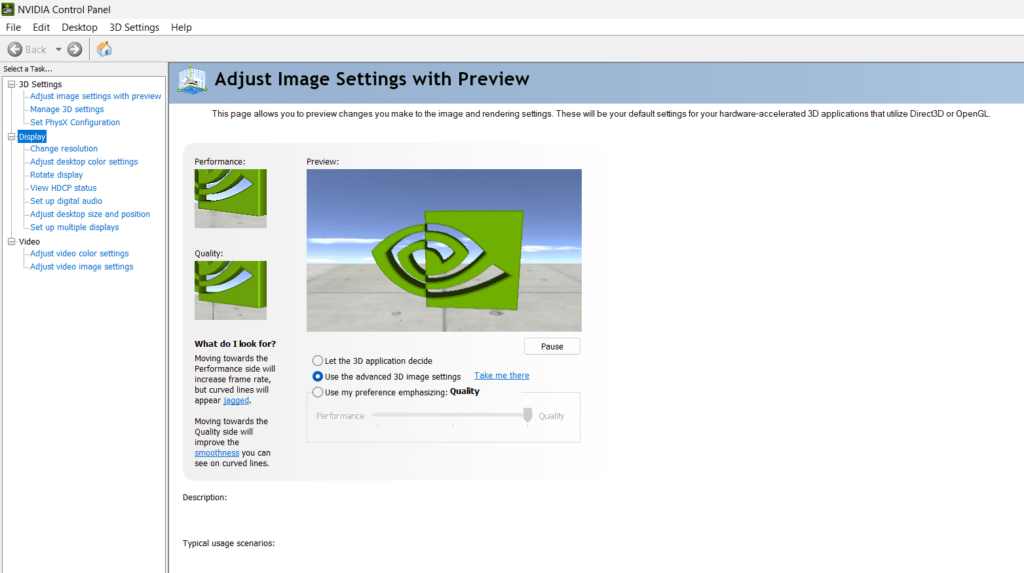
- Open the Nvidia control panel application. You should now see the display settings available within it.
3. Check your display connection
If the monitor is connected to the iGPU, you won’t access the NVIDIA Control Panel for that monitor as the iGPU relies on the generic graphics driver provided by the operating system. But if it’s connected to the dedicated GPU, the NVIDIA Control Panel will be accessible since it has dedicated Nvidia driver support.
So to access the display settings in NVIDIA Control Panel, you need to ensure your monitor is connected to the dGPU instead of the iGPU.
To check if your monitor is connected to the dedicated GPU,
- Identify the dGPU ports: Consult your computer’s specifications or the manufacturer’s website to determine which ports are connected to the dGPU. These ports are typically labeled as “HDMI” or “DisplayPort.”
- Locate the monitor’s connection: Identify the cable that connects your monitor to your computer. Check if the cable is plugged into one of the dGPU ports you identified in step 1.
- Verify the connection: If unsure, you can use a graphics card detection tool like GPU-Z or HWiNFO64 to confirm which graphics card is rendering the display for your monitor.
4. Restart the Nvidia services
The NVIDIA Display Container LS manages communication between the NVIDIA graphics driver and Windows. It also handles desktop rendering and other app functions.
Otherhand, the NVIDIA LocalSystem Container manages how the NVIDIA graphics driver uses system resources and executes tasks specific to the driver. If this service stops, you might encounter issues with NVIDIA features like G-SYNC and NVIDIA Ansel.
Both these services are crucial for the proper functioning of the NVIDIA graphics driver. If you encounter issues with your display or NVIDIA application such as Nvidia control panel’s display settings suddenly going missing, try restarting these services.
To restart the NVIDIA services:
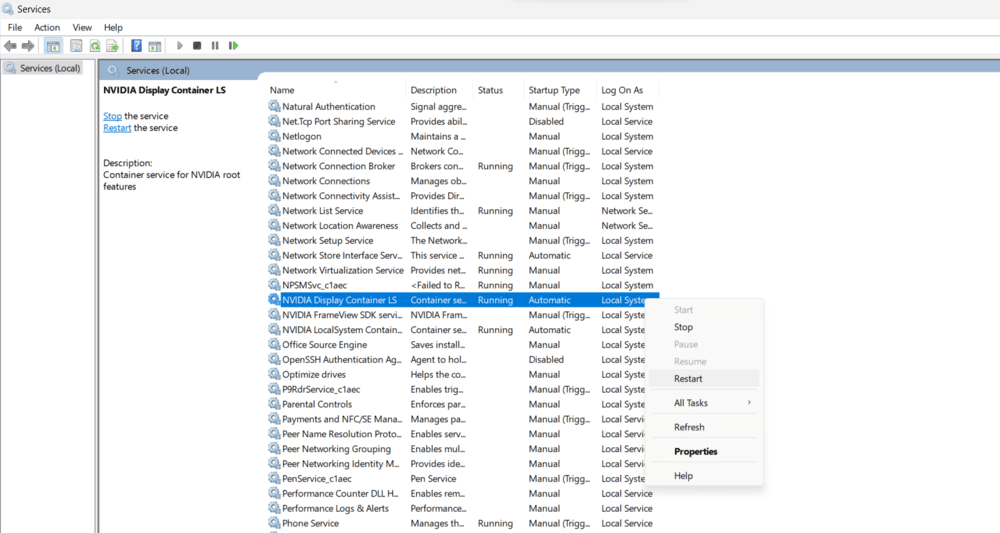
- Open the Services app with services.msc command on the Run window.
- Press N and locate both “NVIDIA Display Container LS” and “NVIDIA LocalSystem Container” services.
- Right-click on each service and select “Restart“.
If restarting the services does not bring back the display settings to the Nvidia Control Panel, you may need to reinstall the NVIDIA graphics driver.
5. Update Nvidia Driver
The simplest method to get the latest Nvidia driver is by updating it through the GeForce Experience app. A new driver might resolve issues causing the absence of display settings in the Nvidia control panel if there’s something wrong with your current driver.
Start by launching the GeForce Experience app on your PC. Get the app here if you have not installed it on your system yet.
Within the app, locate and access the driver’s menu on the left. Click on the “Check for updates” button to initiate a search for the latest drivers suitable for your graphics card. Once the search finishes, if there’s any update found > proceed to download the most recent driver available.

Follow the onscreen instructions to install the driver. You can choose to perform a clean installation by going to custom installation and check the clean installation option with the installer.
6. Rolling back NVIDIA drivers
When you encounter missing display settings in the NVIDIA Control Panel after a driver update, rolling back to the previous driver version can potentially restore those settings. This is because updated drivers may introduce compatibility issues or conflicts with your system configuration.
Before rolling back the driver, it’s essential to consider other factors that could be influencing the missing display settings:
- Firstly, check that your NVIDIA driver matches your operating system. If you’ve updated your Windows recently, ensure the new driver is compatible with the updated OS.
- When considering downgrading the driver, remember it might not gel well with your specific GPU model, so double-check compatibility there too.
- Plus, think about how going back to an older driver might impact performance, especially in tasks that heavily rely on your GPU, like gaming.
Once you have decided to rollback follow these steps:
- Visit the NVIDIA website and download the appropriate previous driver version for your GPU and operating system.
- Then open the Device Manager and locate your NVIDIA graphics card under “Display adapters.” Right-click on the Nvidia card and select “Uninstall device.“
- Select the option to “Delete driver software for this device” during the uninstallation process. This will remove any remnants of the previous driver.
- Execute the downloaded driver installer and follow the on-screen instructions.
- Once the driver installation is complete, restart your computer.
After completing the driver rollback, launch the NVIDIA Control Panel and check if the display settings have reappeared. In case still not available, you can consider updating the Nvidia driver.
7. Disable and re-enable Nvidia Display Adapter
Finally, you can refresh the bridge between the display and the Nvidia driver by resetting the Nvidia display adapter after an Nvidia driver or Windows update.
By disabling the driver, you will halt the operating system’s use of that particular driver for controlling the associated display, and re-enabling the adapter will reset this function.
- To access the Device Manager, press the Windows key and type “Device Manager” in the search bar.
- Click on the search result to open the Device Manager.
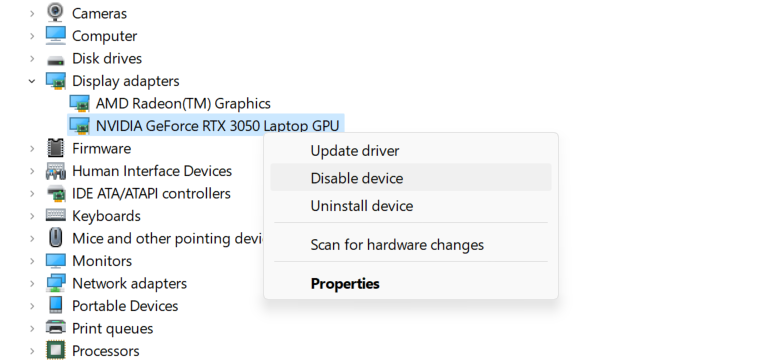
- Within the Device Manager window, expand the “Display Adapters” section to reveal the list of display adapters.
- Locate your NVIDIA graphics card from the displayed list.
- Right-click on it, and choose “Disable device” from the options provided; it should display an icon with an arrow pointing downwards.
- To re-enable the Nvidia display adapter, right-click on it once more and choose “Enable device.“
Summing up:
Still missing display settings in Nvidia control panel? If none of the steps above helped; consider contacting NVIDIA customer support or consulting with your computer manufacturer or a technician for further assistance.

