Encountering the “GeForce Experience Installer Cannot Continue” error can be really frustrating for NVIDIA graphics users. This is a similar problem to when your Geforce Experience app gets stuck during installation at the “preparing to install” stage.
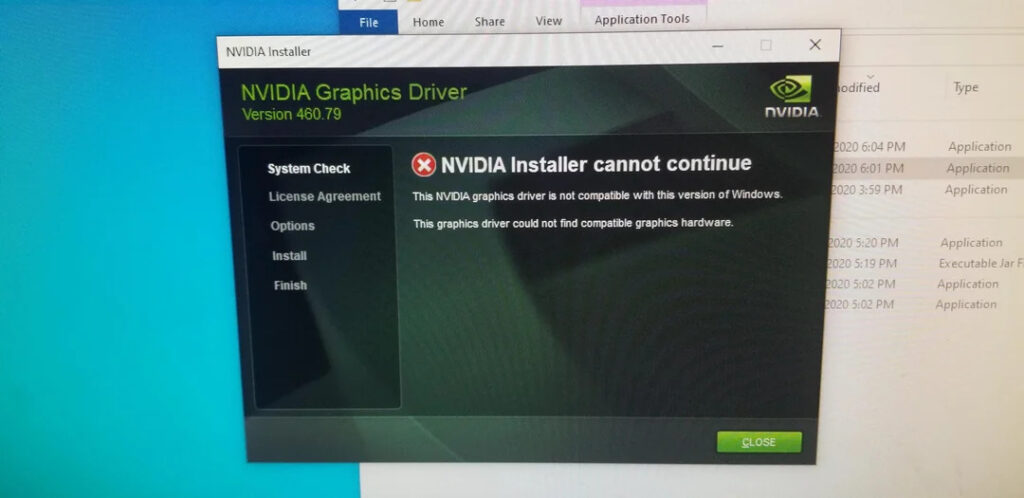
Typically you may encounter this error message “Installer Cannot Continue” when trying to install or update the Nvidia graphics driver through the Geforce Experience app. However, it can also appear when installing the GeForce Experience application itself.
What Can Prevent Nvidia Driver Installation Done via Geforce Experience?
The issue is frequently linked to system incompatibilities, like incorrect driver versions, outdated Windows operating systems, or conflicts with background processes. Corrupted or incomplete driver files due to internet issues or download interruptions can hinder your installation.
If the INF file that contains driver installation instructions holds incorrect hardware IDs that don’t match your graphics card can trigger this driver installation trouble.
An INF file is a plain text file used by Microsoft Windows for the installation of software and drivers. INF files are most commonly used for installing device drivers for hardware components.
How to Fix the “Geforce Experience Installer Cannot Continue” Error?
There are many ways to fix this error, and you might not know which one will work for you. So, it’s a good idea to try the simple solutions first.
1. Re-launch the GeForce Experience App
A fresh launch of GeForce Experience can eliminate temporary glitches in applications. If there were issues, you should be able to install the driver after a re-launch.
First, you should close the GeForce Experience app. Then open Task Manager> go to the process tab and then look for running NVIDIA processes.
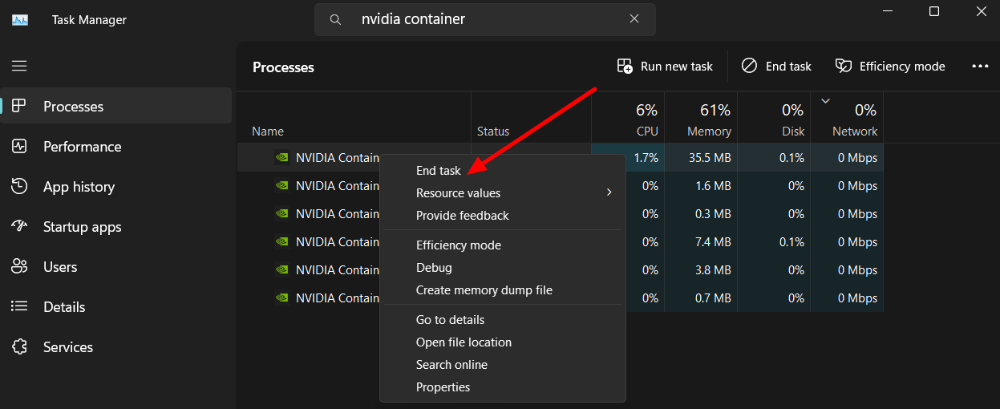
Right-click and select “end task” for those processes. Once you are done close the Task Manager and re-launch the Geforce Experience app > attempt to install the driver again.
2. Shutdown Possible Conflicting Processes
If closing the Nvidia process didn’t help, try shutting down other programs that can possibly conflict with the Nvidia driver. Look for other graphics utilities and overclocking software (if you run any)
You need to follow the first three steps from the “Re-launch” section. Stop any programs that you suspect may cause problems with Nvidia. Then, open GeForce Experience again and try installing the driver.
3. Manually Download Nvidia Driver
If you’re seeing the “Installer Cannot Continue” message while trying to install the Nvidia driver through GeForce Experience, why not try installing the driver manually instead?
First, you need to get your driver from the official NVIDIA website: https://www.nvidia.com/download/index.aspx. Enter your GPU’s model and click on “Search.”
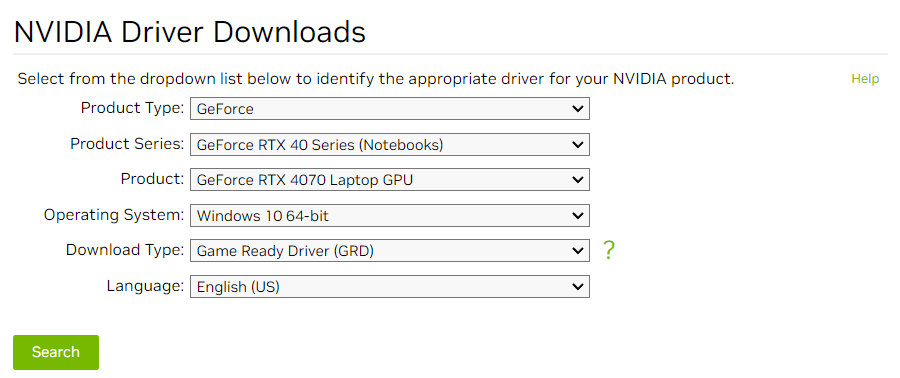
You will find the game-ready driver with the driver version and release date. Click on the download button to get the executable.
Once the download is complete, run the executable and follow the on-screen instructions to complete the driver installation.
If the installation goes through, you must’ve bypassed the installer error.
4. Do Clean Install
A clean install will completely remove existing graphics drivers from your system and then reinstall them.
You can use Display Driver Uninstaller (here’s how to use it) to remove all the traces of your current graphics driver, including registry keys, folders, files, and other driver-related entries.
When you run DDU, you will get to choose your preferences such as GPU type and manufacturer. You need to select device type to GPU and select device to Nvidia. DDU will remove existing driver elements and prompt you to restart your PC when you click on “Clean and restart“.
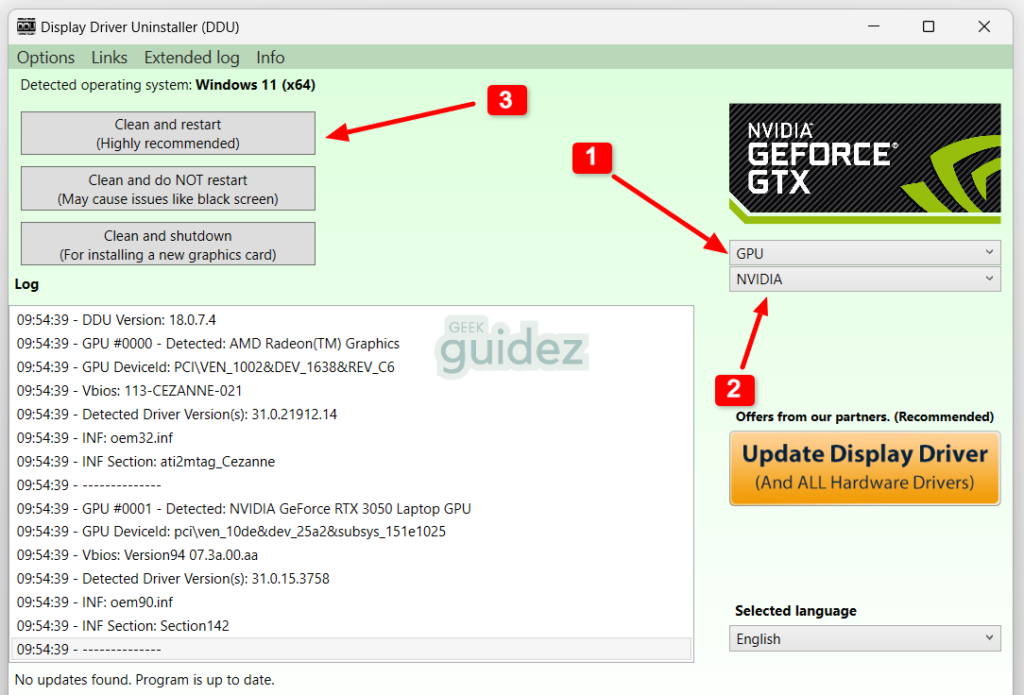
After a restart, you can try installing the driver via Geforce Experience or get the latest NVIDIA driver installer from the official website.
Run the installer and as long as you don’t encounter the “can’t continue” issue, proceed with the onscreen installation steps.
5. Temporary Folder Rename
When you run the NVIDIA installer, it checks for existing files and configurations related to previous installations. By renaming the NVIDIA Corporation folder, you effectively create a backup of the existing configuration.
The installer then treats it as a fresh installation, avoiding any potential conflicts or compatibility issues.
Here’s how to rename the Nvidia folder:
- Press Windows + R to open the Run dialog box.
- Type %programfiles% and press Enter.
- Look for the NVIDIA Corporation folder.
- Right-click on it and choose Rename (or press F2 on your keyboard).
- Change the folder name to something like NVIDIA Corporation.old and press Enter to save it.
- Then try running the NVIDIA installer again.
Important: If the installation is successful, you can delete the renamed folder. Otherwise, you should rename it back to “NVIDIA Corporation“.
6. Install Driver Using Device Manager
In Device Manager, you can update drivers by right-clicking on the graphics card under “Display adapters” and selecting “Update driver”.
Windows will automatically search for the latest driver online and install it. However, it doesn’t always perform a clean uninstall of the previous driver. And sometimes device manager can’t get you the latest driver release.
Despite this, you can try updating the driver using the device manager and if that installs successfully, you’ll have your Nvidia driver installed without any intervention.
7. Disable Antivirus/Malware Services
Disabling this service can leave your computer vulnerable to malware and viruses. However, Windows Defender can sometimes block driver installations if it perceives them as potential threats. One common scenario is when Windows Defender’s Ransomware protection mistakenly identifies driver installation as suspicious.
To address this, you can:
- Temporarily disable Controlled Folder Access (which is part of Ransomware protection).
- Install the drivers.
- After installation, re-enable Controlled Folder Access.
If you have an aggressive third-party antivirus or anti-malware program running, you can consider temporarily disabling live monitoring in your antivirus software during the driver installation.
Also temporarily disable the Windows firewall during the installation of the driver. Here’s how you can disable the firewall:
- On the Windows search bar, search for Firewall.
- Click on the Windows Defender Firewall.
- Select Turn Windows Defender Firewall On or Off.

- Then turn off the Firewall for both public and private networks.
- After that, try to install the Nvidia driver and see if that helps.
Remember to re-enable the firewall and Anti-virus once you’re done with the try. If these steps don’t help, you should run a system file repair to fix possible corrupted files.
8. System File Repair
You can use the System File Checker (SFC) utility to fix issues caused by corrupted or missing system files. Corrupted files can prevent your installation and here’s how you can get around that:
- Open a Command Prompt window with administrator privilege.
- Type sfc /scannow and press Enter.

This command will scan your system for corrupted files and attempt to repair them. Once the scan is complete, restart your computer and try installing the drivers again.
9. Run DISM Scan
DISM (Deployment Image Servicing and Management) is a Windows utility that also repairs system image files and prepares Windows images for deployment. If the NVIDIA driver installation fails due to corrupted system files or other issues, running a DISM scan can help.
First, you should run DISM /Online /Cleanup-Image /ScanHealth to check health of the system image. If any corruption or issues are detected, it will attempt to repair them.
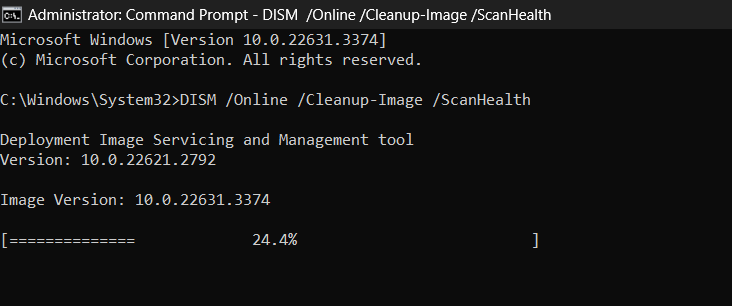
Alternatively, you can run the DISM /Online /Cleanup-Image /RestoreHealth command to restore the system image by downloading clean files from Windows Update or a specified source.
Note: You might need to be patient, as the DISM scan can take some time depending on your system’s speed and the extent of potential corruption.
After running DISM, reboot your PC and attempt the NVIDIA driver installation again.
You can also read | How To Fix Geforce Experience Not Installing
10. Modify the INF File
Caution: This process has tricky steps and could make things worse if not done right. Only try it if you’re skilled and willing to take the risk.
Before proceeding, ensure you have:
1. Downloaded the latest driver installer from the official NVIDIA website.
2. Extract the Driver and Locate the INF file
Step 1: Extract the Nvidia driver installer using a program like 7zip.

Step 2: In the extracted folder navigate to > Display.Driver folder and look for the “nv_dispi.inf” file. If you can’t find nv_dispi.inf, you can search for “nvts.inf“, “nv_dispwi.inf“, or “nv4_dispi.inf” instead.
Usually, the file you are looking for appears first in the list of .inf (setup information) files. Right-click on the file and make a copy of it to another location as backup.
Then right-click again and open the original .inf file in a text editor such as Notepad.
Step 3: Now head over to this file: pastebin.com/raw/TZJ0kCMj and then use ctrl + F to search your GPU’s model (for me it’s RTX 3050). There can be multiple strings, copy the first one.
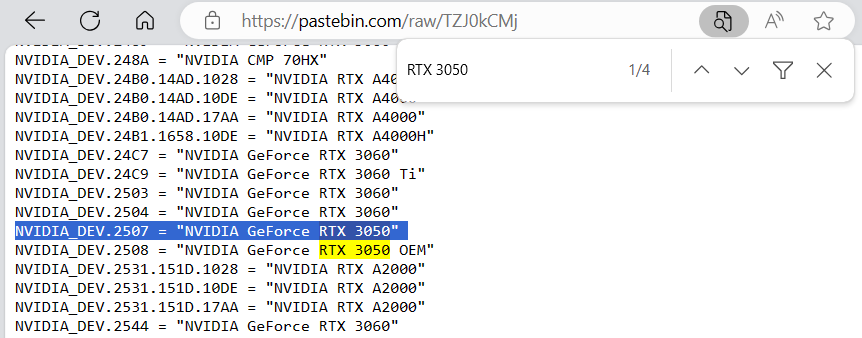
Then come back to the .inf file you have opened on Notepad and use ctrl + F to search for string and keep searching down until you arrive at the [Strings].
Step 4: Now add that copied string from pastebin after this line “NVIDIA_A = “NVIDIA” in your .inf file.

Step 5: Next, you need to take the first part of that device string that is (NVIDIA_DEV.2507) for me and search using ctrl + F on any of these paste.

Step 6: Copy the line you find in the paste
(for myself it’s %NVIDIA_DEV.2507% = Section079, PCI\VEN_10DE&DEV_2507)
Now you need to paste that line in the Manufacturer section of .inf file. For that, search for “Manufacturer” in the .inf file and paste your device code after [NVIDIA_Devices…..].

Once you are done, save the .inf file and launch the setup.exe from Nvidia driver’s root directory.
Important Notes:
- Double-check all modifications carefully before saving the INF file.
- Incorrect edits can lead to driver installation failures or even system instability.
- If you encounter issues after modifying the INF file, restore the original version or seek assistance from a qualified technician.
If none of the above solutions work, you should seek further assistance from the NVIDIA support team or a qualified technician. They may help you diagnose the issue and provide more tailored solutions.

